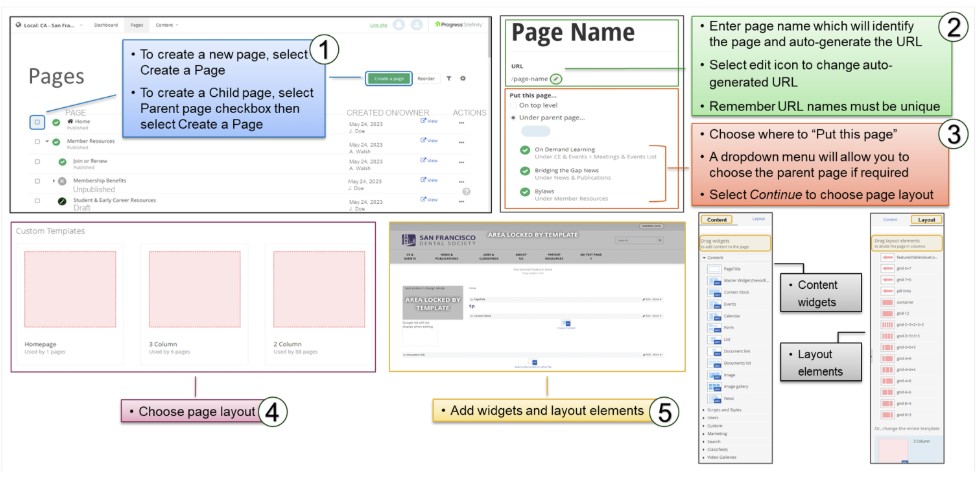
 To create or add a new page:
- Navigate to the Pages screen and select Create a Page.
- To create a child page, check the box of the parent page before selecting Create a Page.
- Provide page details:
- Page Name: Identifies the page and auto-generates the URL (editable via the edit icon).
- Placement: Choose whether the page will be a parent page or a child under an existing parent.
- Navigation Options:
- Show in Navigation: Displays the page in site navigation.
- Group Page: Serves as a container for other pages without its own content.
- Redirect Page: Redirects visitors to another page.
- Click Continue or Create depending on the selected options.
Structuring and Customizing Pages
Before adding content, users must select a Page Layout Template to define the page's structure. Content can be added using widgets available in the Content Menu, such as:
- Page Title
- News & Events
- Content Block
- Image Gallery
- Custom Marketing Elements
Users can further adjust scripts, styles, and other advanced settings.
Publishing and Managing Pages
Once content is added, administrators can:
- Preview the page before publishing.
- Publish the page immediately.
- Save as Draft to edit later (draft pages appear with an edit icon instead of a green checkmark).
- Unpublish a page if it needs to be taken down (unpublished pages display a gray X).
- With Sitefinity CMS, content authors can create pages in a simplified and seamless manner. When creating a new page, you only need to provide the essential properties of a page. At any point in time, you can further configure the page behavior by defining additional page settings. Once pages have been created, you can easily reorder, edit and manage them from the list of pages screen. Searching for a specific page is made easy with advanced filtering and sorting options.
-
Pages can be edited using the Actions Menu. The available actions include:
- Edit Content: Modify content, widgets, and layout.
- Title & Properties: Adjust page name, URL, SEO settings, and permissions.
- Schedule Publish/Unpublish: Set a date and time for publishing/unpublishing.
- Create a Child Page: Convert a page into a parent by adding a subpage.
- Share Preview Link: Generate a temporary preview link (expires in one day).
- View Linked Items: Display items linking to the selected page.
NOTE: Do not use the Duplicate function in the Actions menu as it can cause errors with your page. You can edit the content of a page, such as layout elements and widgets. To do this, on the Pages screen, perform one of the following:
- Click the name of the page.
NOTE: If the page you have clicked is a group page, the system opens the Page title and properties dialog, where you can edit the properties of the page.
2. Click the (Actions) context menu of the respective page and click Content. The page opens in content editing mode.
3. When you are finished editing the page, perform one of the following:
- If you have opened for editing a page in status Draft, Unpublished, or Rejected, perform procedure Manage pages and content items in status Draft, Unpublished, or Rejected.
- If you have opened for approving a page in status Awaiting approval, perform procedure Manage pages and content items in status Awaiting approval.
- If you have opened for publishing a page in status Awaiting publishing, perform procedure Manage pages and content items in status Awaiting publishing.
- If you have opened for editing a page in status Published or Scheduled, perform procedures Manage pages and content items in status Published or Manage pages and content items in status Scheduled respectively.
- If you are editing a published page, the system saves a draft of that page, but the published version is still visible on the webpage. To see, which version is the currently published one, see Revision history of pages.Watch this Video or view this Job Aid - Pages